Original price was: $3.99.$2.99Current price is: $2.99.
Book details:’
Total of 12,700 words with many images and video links (111 x pages, size A4 pages).
Complete instructions for papermaking from recycled paper. It also includes electrical circuits, digital technology, like the programming of microprocessors. Many pictures, instructions, video links, and illustrations are included.
Keywords:
Papermaking, paper drying, paper pulp, couching, paper press, circuitry, copper adhesive tape, LED’s, batteries, mould and deckle, microprocessor, Arduino Uno, Micro:bit BBC, Picaxe, Raspberry Pi, computational books, pop-up card making, greeting card making, nets, sustainability, taking social action, global citizenship, fair trade, paint techniques, STEM Education, STEAM Education, ESSSTEAM Education, Blockly, Chibitronics
CONCLUSION
In this book, the author has endeavoured to provide an introduction to handmade papermaking from recycled materials. From the equipment required for making a mould and deckle, to techniques for making artistic paper, are all included. The book progressed to pop-up greeting cards (paper mechanics/origami) and then developed ideas around electrical circuits and the programming of microprocessors (make LED lights blink, etc.).
The handmade paper could be used to create the greeting cards. The digital curriculum, with the title ‘…from computer mouse clickers to computer programmers,’ is touched on. This book is a great resource for those teachers, parents, and educators who want to include an integrative, layered approach to their teaching.
Additionally, the author has included important educational principles like global citizenship, sustainability, and taking social action. The book’s contents are mainly introductory. It is surely a great resource for teachers, educators, and parents who want to combine an organic (natural) approach (papermaking) with technology (circuits and computer programming).
After reading this book the teacher, student or parent/caregiver should have the basic know-how on how to make paper, how to make greeting cards, and how basic circuits and microprocessor programming works. With this new knowledge, they can explore more challenging projects.
Practice and experience are required to be more creative with lessons on papermaking and digital technology. The more the reader engages and experiments with the ideas and concepts presented in this book the more challenging the lessons and design briefs will become. We live in a rapidly developing technological world. It is the responsibility of parents, teachers and caregivers to stay ahead of technological development to lead technologically advanced lessons and lesson plans. As one develops the confidence using technology, the possibilities of integrating more subjects and fields of study into a lesson multiplies. It is the relevance to other areas of study that inspires new collaborative creative lessons and lesson ideas.
PAPERMAKING: POP-UP GREETING CARDS WITH CIRCUITRY AND THE PROGRAMMING OF MICROPROCESSORS.
This book includes not only the awesome papermaking techniques for artistic paper, but it also challenges children and students to explore and develop mechanical and electrical concepts and techniques. The book focuses on pop-up greeting cards with electrical circuits. This is the ultimate combination of integrated learning aspects namely, art, science, mechanics, electricity, mathematics, engineering, technology. STEAM Education (Science, Technology, Engineering, Art, & Mathematics) – project-based learning.
With some of the burning issues of our planet, like dwindling resources, pollution, poverty, taking social action is critical. Another important aspect is the role of digital technology in our daily lives. Although we would all love to indulge in natural and organics activities we have to educate our students and children about digital technology (microprocessor programming, and more).
“From computer mouse clickers to computer programmers (understanding code),” is the slogan for current education trends. The book Papermaking from Recycled Materials and Pop-up Greeting Cards with Circuitry, endeavours to provide the basis for all the relevant education and training required in our modern age of computers.
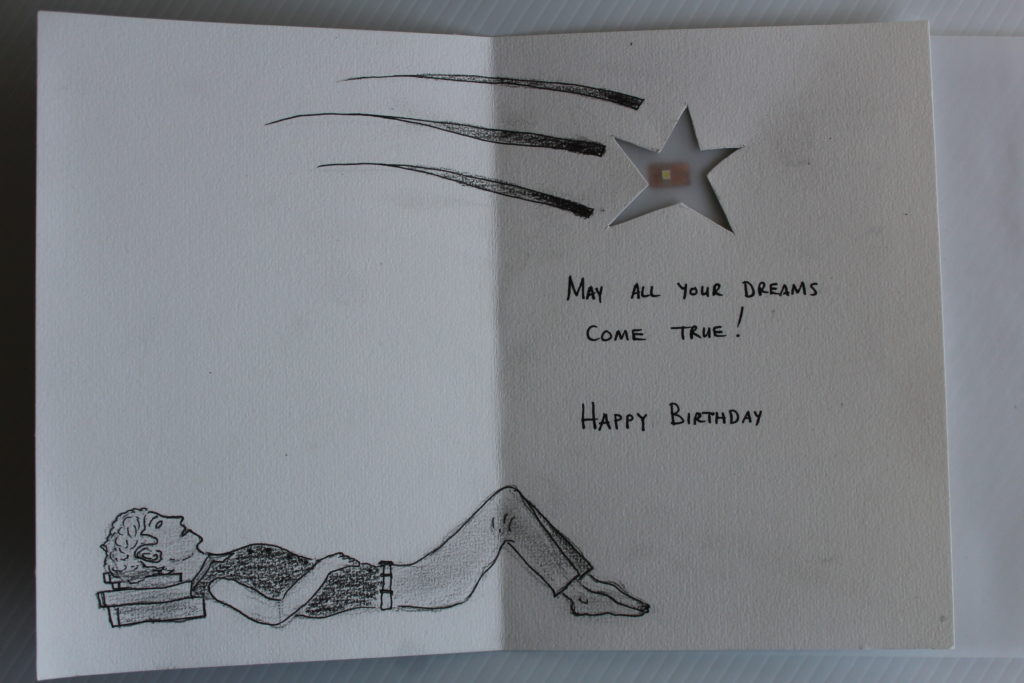
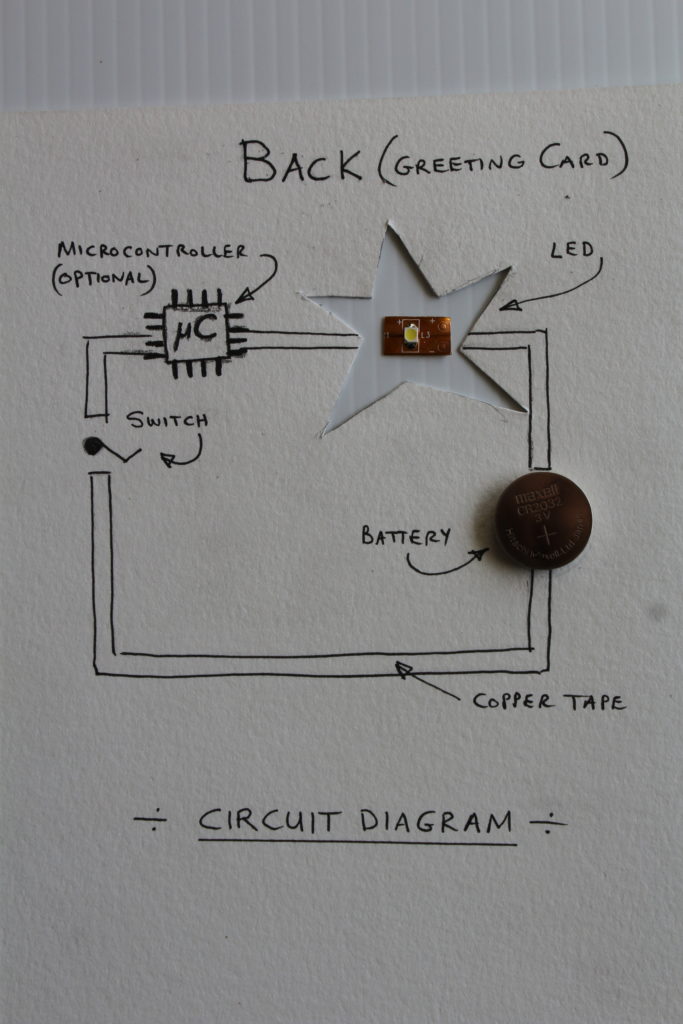
Pop-up greeting card with circuitry:
Programming a microprocessor:
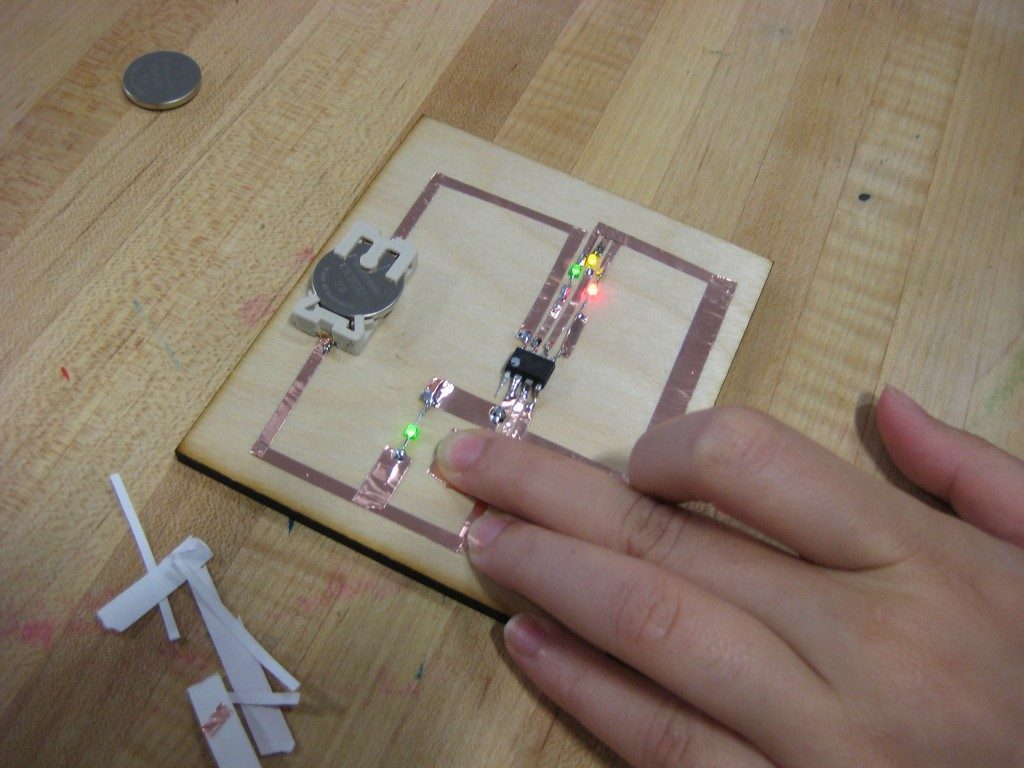
IMAGE: Typical copper tape circuit including flashing LEDs lights, a 3-volt coin battery and switch. This circuit could be used to install lights to the cathedral pop-up card. Consider how the copper tape circuits will run at the back of the card. The LEDs will be installed behind the walls of the cathedral (‘interior lighting’). Credit: David Mellis (MIT). Copper tape circuit workshop. Frickr.com. https://www.flickr.com/photos/mellis/6235312983/in/album-72157627872838172/
Description
EQUIPMENT REQUIRED FOR PAPERMAKING
All you need to do is collect all the scrap paper lying around. Find a plastic storage tub and an old kitchen blender? With a few supplies and these basic instructions, you’re well on your way to making handmade paper and being ridiculously friendly to the environment.
Supplies for Making Paper:
- Water
- Scrap Papers
- Plastic storage tub or vat (shallow tray)
- Kitchen blender – get one from the opportunity/thrift store at a low price
- Mould & Deckle (a mesh screen attached to a frame). See here how to create your own mould and deckle: How-to make a mould & deckle
- Wood boards, sponges & a rolling pin
- Used towels, wool blankets, cloth, pellon, blotting paper, or other absorbent material
- Additional collect petals, leaves, flowers, seeds, and almost anything organic and lay it flat on the paper. This will elevate the paper art to the next level. However, there are so many more ideas!
- Paper press: You could improvise by placing the paper between two sheets of plywood. Just stand on it to press it – simple. However, if you want to invest in a simple paper press you could make one, or you could purchase a professional paper press. To start with, pressing with your body weight will work just fine!
- For quick drying use a clothes iron (wrap paper in cloth and iron till dry). Be careful not to burn yourself!
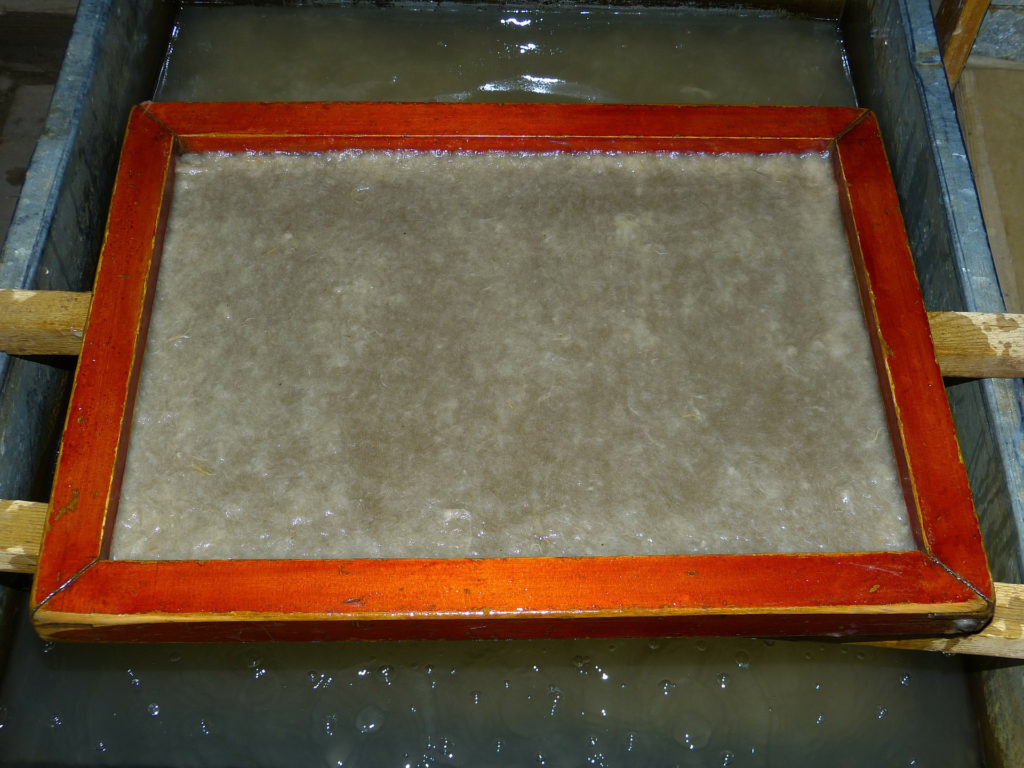
IMAGE: Simple mould and deckle. Consists of a wooden frame on top of another wooden frame covered with fine aluminium mesh (allow water to drain). See the white wet paper on the mould (bottom frame) ready to flip onto some blotting paper.
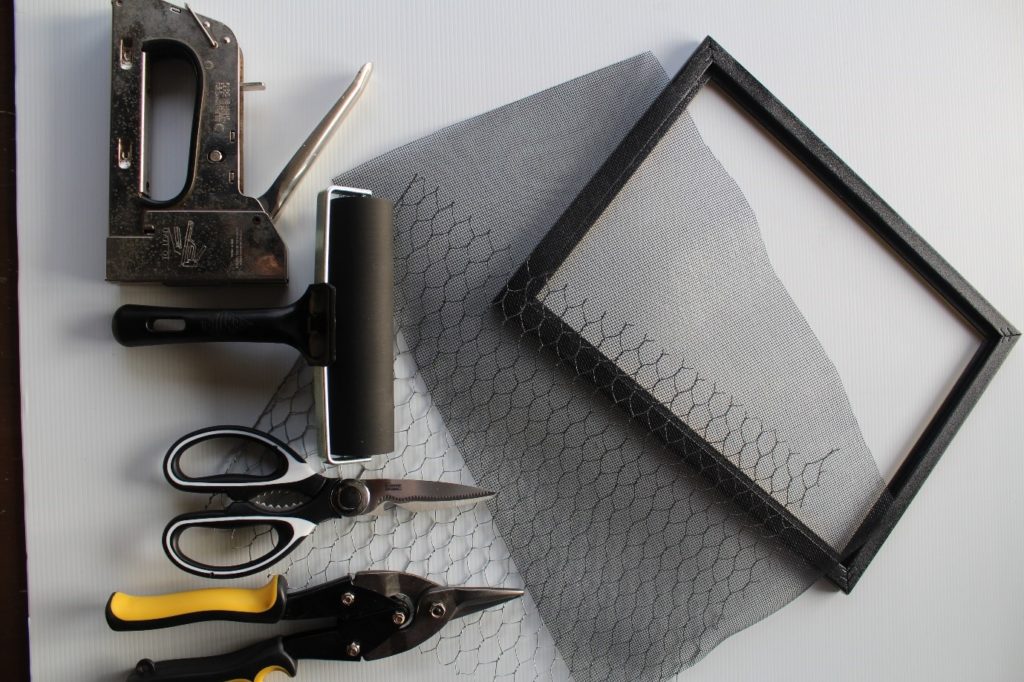
IMAGE: Equipment to make a mould and deckle. Stapler, roller (to push water from the wet paper into absorbent blotting paper), scissors, tin snips, flyscreen (nylon or aluminium), chicken mesh (galvanised), and 2 x size A4 picture frames (new or used). Credit images – creating a mould and deckle – W van Zyl.
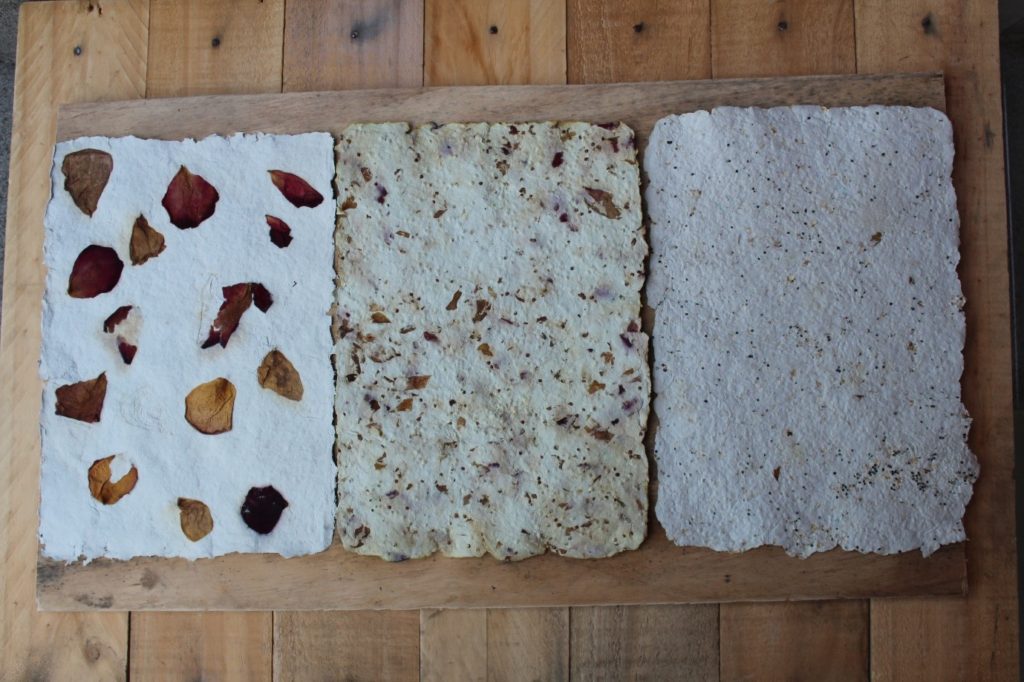
IMAGE: No restraint drying. See the wavy paper in this photograph. It was left to dry without any restraint on it. Techniques (left to right): Rose petals on the surface, shredded rose petals, & Chia seeds and oats.
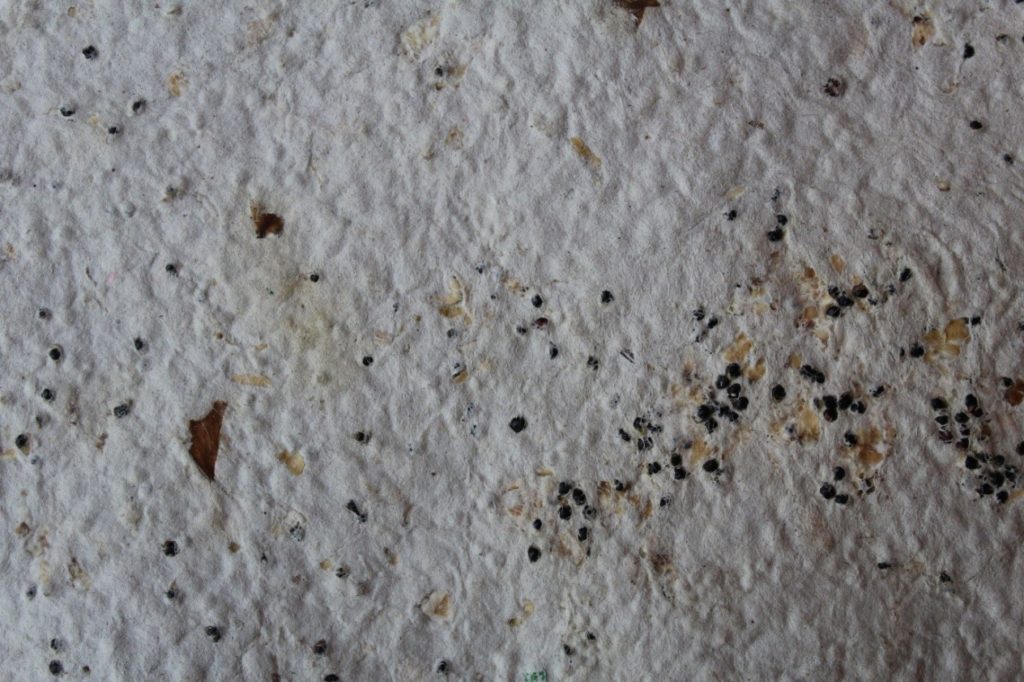
IMAGE: Here oats and chia seeds were stirred into the pulp to create a unique roughly textured effect. You could consider adding different seeds to the pulp – stir it in by hand. The paper is unique, and when the paper is buried in the soil, the seeds will germinate. Think about different sots of flower seeds! Can you think of any other organic materials you could add to your paper? The possibilities are endless!
Contents
Synopsis: Page 4
Introduction. Page 9
Brief outline with some details of this book. 9
ABOUT PLANTS AND PAPERMAKING: 10
IN SHORT: THE PAPERMAKING PROCESS FROM RECYCLED PAPER. 10
ALTERNATIVE DRYING TECHNIQUE: THE IRONING METHOD – WHEN YOU ARE IN A HURRY AND CAN’T WAIT FOR THE PAPER TO DRY. 12
LONGER DRYING METHOD.. 12
DRYING THE PAPER ON GLASS: THE SIMPLEST AND MOST ECONOMICAL WAY TO DRY PAPER. 13
Equipment required for papermaking. 16
Supplies for Making Paper: 16
MAKING A SIMPLE MOULD AND DECKLE FROM USED OR NEW PICTURE FRAMES. 16
You will need: 16
ADDITIONAL TOOLS YOU WILL NEED: 17
STEP 1. 18
STEP 2: 18
STEP 3: 18
HOW TO MAKE PAPER FROM THE RECYCLED PAPER. 22
STEP 1: CUT UP, OR TEAR THE PAPER (ALTERNATIVELY USE A PAPER SHREDDER) 22
STEP 2: BLEND IT & MAKE A VAT OF PULP. 25
STEP 3: PULL SOME SHEETS. 25
STEP 4: COUCHING (Pronounced ‘coo-ching’) 26
STEP 5: ROLLING AND PLYWOOD PRESSING.. 33
STEP 6: PRESSING OPTIONS. 34
Option 1: Hand Pressing. 34
Option 2: Board Pressing (stacking) 34
STEP 6: DRYING TECHNIQUES. 36
Option 1: Quick drying using an iron (if you are in a hurry) 36
Option 2: Surface Drying (any flat surface will suffice) 36
Option 3: Exchange Drying (for flat sheets of paper) 36
Option 4: The No-Restraint Drying Method. 37
Option 5: The Dry on Pellon, or Cloth, method. 37
HOW TO SAVE AND STORE LEFTOVER PULP. 38
GLOBAL CITIZENSHIP, REDUCING POVERTY, SUSTAINABILITY, AND TAKING SOCIAL ACTION.. 39
WHAT IS FAIR TRADE?. 39
The key principles of fair trade: 39
More about Trade Aid: Prokritee (Bangladesh) the Art of Handmade Papers: 42
VIDEO: Prokritee (Bangladesh) the art of handmade papers. 43
SAMPLES OF THE HANDMADE PAPER FROM THE WOMAN IN BANGLADESH: 43
Fun Projects to Do, Once you Have Mastered the Basics. 50
LIST OF SOME PAINT TECHNIQUES. 57
IDEA: Create a small cardboard box for a gift (nets). 62
LEARNING ABOUT NETS: 62
STEM, STEAM, AND ESSSTEAM… 64
EXCITING CREATIVE AND INNOVATIVE DESIGN BRIEF: 65
ALTERNATIVE APPROACH: Tell your story through sculpture or 3-D mode. 66
MOVING FROM THE BASIC CIRCUITRY TO MORE ADVANCED ELECTRICAL AND ELECTRONIC COMPONENTS AND SYSTEMS. 69
ARDUINO PROGRAMMING SETS: 70
YOU CAN LEARN ARDUINO IN 15 MINUTES: 71
Interested in electronics?. 72
FREE SOFTWARE AVAILABLE FORM THE ARDUINO WEBSITE: 73
PRACTICE MAKING A VERY SIMPLE GREETING CARD WITH ONE LED LIGHT. 85
WHY NOT ATTEMPT TO CREATE A POP-UP GREETING CARD. INCLUDE EVERYTHING YOU HAVE LEARNED UP TO NOW. 91
HOW TO USE THE CATHEDRAL POP-UP CARD TO INCLUDE LED LIGHTS AND A MICROPROCESSOR. 92
WHAT IS A PICAXE MICROPROCESSOR OR MICROCONTROLLER?. 92
Programming Software. 94
What is Blockly?. 94
FLOWCHARTS: 96
THE CIRCUIT TO THE CATHEDRAL POP-UP GREETING CARD: 99
Chibitronics blends art and engineering through paper electronics: 99
Extravagant Computational Bookmaking. 99
How to sketch with electronics. 100
The Chibitronics Starter Kit. 101
Using old books to create pop-up pages. 101
Art: Using electronics and computational components. 102
Conclusion. 103
ABOUT THE TEACHER AND AUTHOR: 105
More books by the author: Page 106
More eBooks you could be interested in: Page 107

